How to Disable UAC in Windows 7 : FIXED --December-2015
UAC Stands for User Account Control and
was first introduced in Microsoft Windows Vista and Windows Server 2008
Based Operating Systems with a motive of providing Full security to
Windows by making Limitation for Normal User Privileges Until Autorized
by the Administrator.They are Many Tasks that Requires UAC(User Account
Control) like During Installation and Uninstallation of Software’s ,
During Windows Updates, Installing Device Drivers or While Running
Application as an Administrator etc and Much More.UAC Sometimes Become
very much Annoying for Most of the Users while Performing the above
listed tasks that Requires UAC (User Account Control) and thus Causing
Frustration.So Here in this Post I am going to Provide You Different
Solutions on How to Disable UAC in Windows 7.Here is a Step by Step
Guide on How to Disable UAC in Windows 7 with Full Instructions
Windows 7 Change UAC : Disable and Enable UAC
Disable UAC Using Control Panel
- First of all Open Control Panel Through Start Menu -> Control Panel -> User Accounts and Family Safety -> User Accounts
- Now Select Change User Account Control Settings as shown below
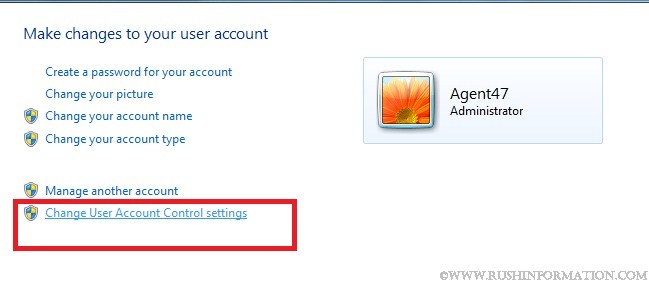
- Now On the Slider Bar Move the Slider to the Bottom Never Notify and Click OK

- Restart You Computer so that Effects can Take place
- You are all done and You have Successfully Disable UAC
Disable UAC Through Registry Editor
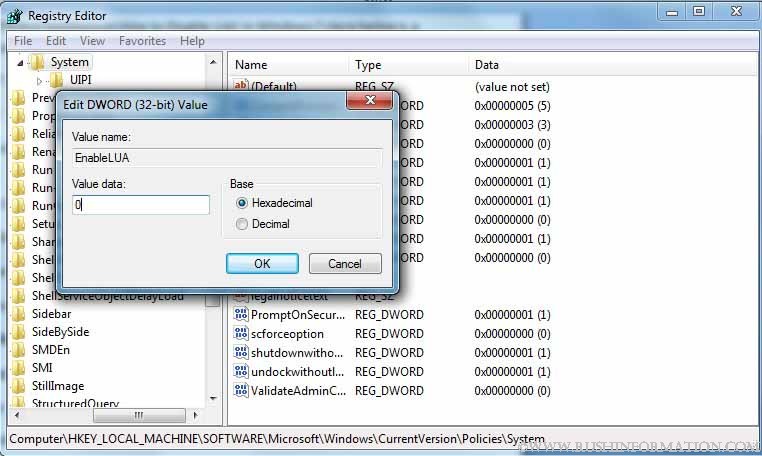
- First of all Go to RUN and Type regedit to open Windows Registry Editor
- Now Search For the Following Key
HKEY_LOCAL_MACHINE\SOFTWARE\Microsoft\Windows\CurrentVersion\Policies\System
- Now on the Right Hand Side You will See EnableLUA key and Double Click on that as shown below in the image

- Set Value 1 – For Enabling UAC
- Set Value 0 – For Disabling UAC
- Now Restart Your Computer so that Effects can Take place
- You are all done and You have Successfully Disable UAC
Disable UAC Through Group Policy Editor
You can Use Group Policy Editor to
Disable UAC if you want to make Changes to Several Computer at Once
which has Local Group Policy or Active Directory-based GPO.
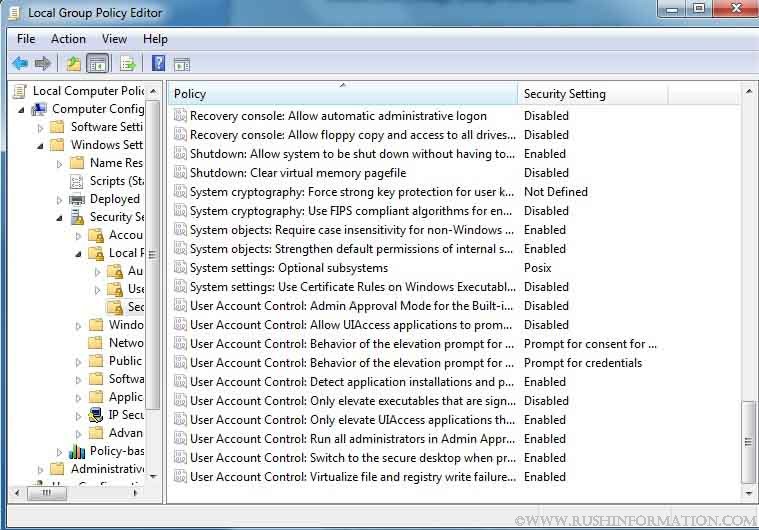
- First of all You need to Open Group Policy Editor . To open it Type gpedit.msc in RUN
- Now Go to Computer Configuration -> Windows Settings -> Security Settings -> Local Policies -> Security Options
- Now Search For the Following Policies and Set their Value to Disabled
- User Account Control: Behavior of the elevation prompt for administrators in Admin Approval Mode
- User Account Control: Detect application installations and prompt for elevation
- User Account Control: Run all administrators in Admin Approval Mode:
- User Account Control: Only elevate UI Access applications that are installed in secure locations
- Now Restart You Computer so that Effects can Take place
- You are all done and You have Successfully Disable UAC
Comments
Post a Comment